How to Hold and Photograph a Trout: Tips for Catch and Release While Still Getting Great Photos to Share
In a recent newsletter, I asked subscribers to submit their fly fishing questions and ideas for stories that they’d like to see on this website. William S. of Flemington, NJ, suggested a blog post about how to photograph fish as well as a few basic handling tips. At first, holding and photographing your catch might seem like completely different topics. Truth is, they influence each other, and with proper handling techniques, you can ensure a trout’s survival upon release and have a lasting memory to show to your pals or share on social media.
Think of all the crappy fish photos you see on social media nowadays. Think of all the nice trout that are incredibly mishandled for the sake of these photos. It seems ridiculous that we stress a fish so much for a photo that we may never look at again after we get a few likes on our social profiles.
However, with a few simple techniques, you can ensure the survival of the trout after release AND have a photographic souvenir that will both do the fish justice and evoke memories of a great day on the water. And with the photographic capabilities of today’s smart phones, taking quality fish pictures is easier than ever.
Over the years, I’ve won numerous photography awards, and several of those awards have been for photos of trout. There weren’t any complicated set ups involved. No special lighting. Each award-winning photo was just a result of following these few simple steps, and I guarantee these will improve the quality of your fish photos, too. But please note that none of these are meant as a criticism of anyone. I look back on photos I’ve taken over the years, and even recently, and I cringe at some of the ones in which I could’ve handled the fish better. We’re all learning how to best conserve this precious natural resource. Let’s get started.
Net Your Catch
By far, this is the most important part of getting good photos of your catch. Netting fish allows you to land it quicker and immobilize the fish without the stress of it splashing around in front of you. Make sure to keep the basket with the fish submerged while you dig your phone out of your pocket or fishing vest. This will keep the trout wet and calm. For a fish, every second out of water is a second spent basically holding its breath. When determining how much time you can keep a fish out of the water, think of how long (and how short!) you can hold your breath and use that as a judge.
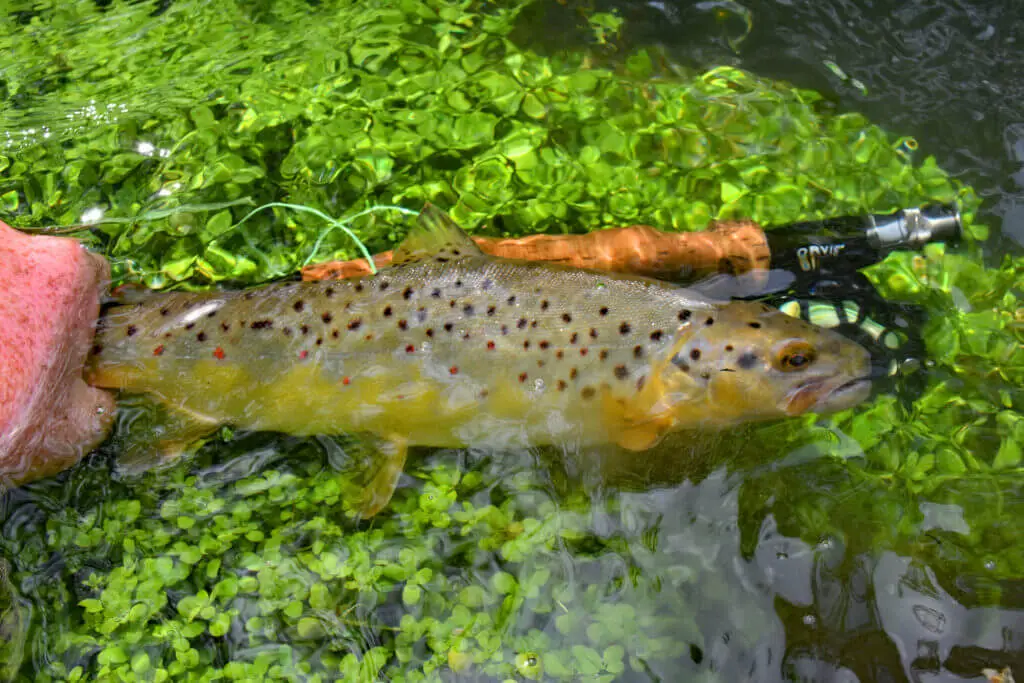
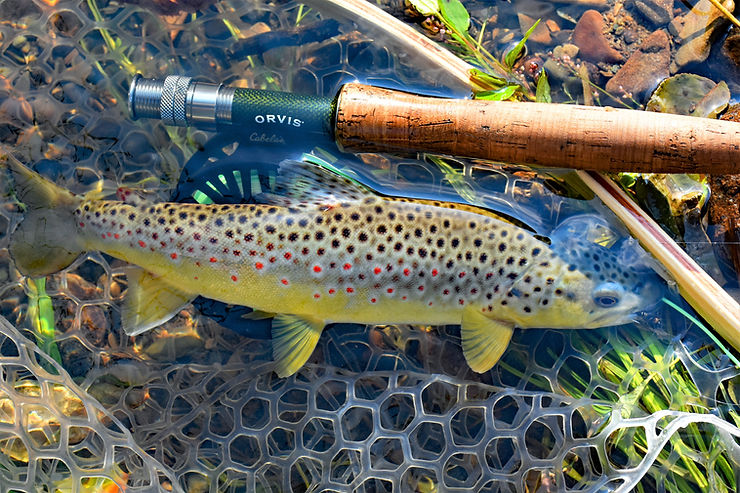
Move into shallow water where you can lay down your rod and not have to fight the current while trying to handle the fish. Keep the fish in the net in the water until you’re ready to take the picture. Sometimes I like to get in shallow enough water where the fish is still partially submerged but will lay on its side, but an even better photo can be had if the fish can sit upright in the net. If possible, I incorporate my fly rod or reel into the shot for perspective.
When taking photos of fish in the net, I sometimes grasp them near the tail. Holding with two or three fingers between the tail and adipose fin and then turning the fish slightly onto its side, with a fly rod for perspective, can really showcase the length of a trout while also handling the fish as little as possible. Once you snap a couple good photos, you can simply unhook the trout and let it slip back into the water. Even if you cradle them under the belly, a net makes photo and release so much easier on the fish, and your photos will turn out much better.
Avoid the Squeeze
Always take care to not squeeze a trout. Squeezing can damage their internal organs, and while the trout may swim off, they will inevitably perish hours or even days later. Also, squeezing fish just makes for a bad photo.
I’m not really sure why so many anglers nowadays practice a “knuckle-hold” on trout, where it appears their fingertips dig into the fish’s belly. As long as they don’t squeeze too hard, this hold probably stabilizes the fish without hurting it, but it doesn’t really make for an aesthetically pleasing photo. In my experience, trout photograph best when held like the fragile creatures they are.
No death grips! If you’re holding the fish over the net, even if it does flip out of your hand, you’ll have another chance for a photo. Always be mindful of how hard you’re holding the fish.
Mind Your Fingers
When handling a trout, be mindful of how much you’re actually touching it. The more you actually touch a fish, the more protective slime you’re removing from their skin. This slime is produced from cells in the skin and is meant to protect the fish from parasites and bacteria that can ultimately kill the fish. Also, a photo that shows more fingers than fish isn’t exactly appealing either.
This is also why we often hear the phrase “keep ’em wet.” They’re not just referring to keeping the fish wet, although that’s important, too, but they’re also talking about your hands. When your hands are wet, they have a lower chance of removing that protective slime.
The same thing happens when the fish is set on the ground or rolled around in the dirt. This all damages the fish’s protective slime. And sure, the fish will swim off, but long after you’re gone, there’s a good chance that fish will die as a result of being caught and mishandled. Also, a photo of a dirty fish covered in debris isn’t exactly one to be proud of.
Get Low and Close to Reduce Glare
Avoid shooting down on fish. Often, this angle will pick up any glare from the sun and you won’t be able to clearly see the fish’s colors. Rather, hold the fish upright and just above the water line, if not partially in the water, and shoot the photo from down low, too. Your phone or camera should be inches above the water as well. This is actually my favorite angle. I especially like shots in which the fish is partially submerged because it makes you feel like you’re entering the fish’s world. Again, quickly playing and netting the fish can make getting this shot a breeze.
The trout can remain in the water until ready to be lifted up for the photo, and then returned to the water with little stress. This lower angle will also reduce glare so that you can fully see the coloration of the trout. When possible, take the photo with the sun at your back, but take care that your shadow isn’t falling on the fish. If you see glare on the fish, turn the fish until it’s gone by simply shifting it upright or laying it flat.
Use Props for Reference
Whenever possible, I incorporate props into a photo of a big fish to emphasize its size. Typically this is just my net or fishing rod, and usually the reel.
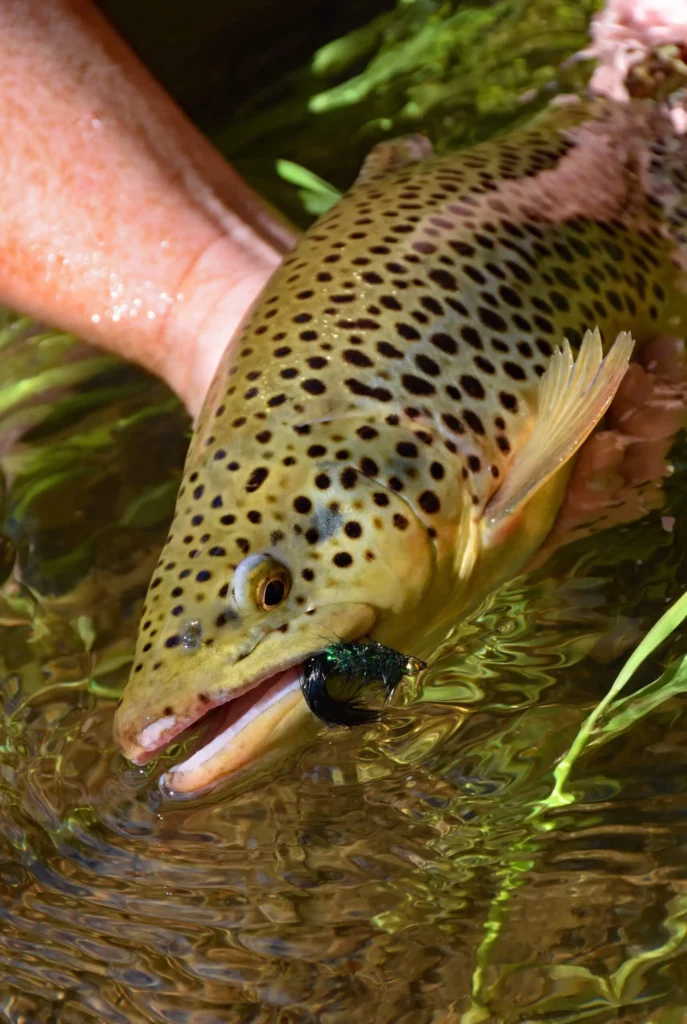
Also, I try to leave the fly in the trout’s mouth, unless it has already popped out. The fly can add a unique feature that makes photos more visually appealing.
The Hero Shot
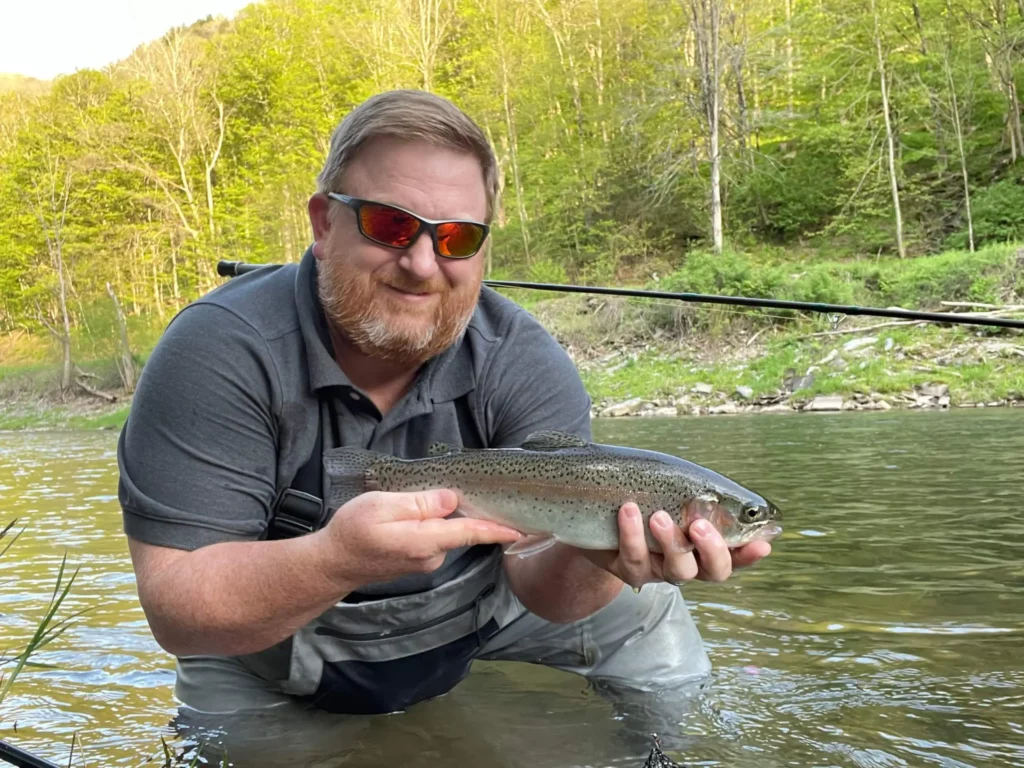
Let’s say you just absolutely have to have a photo of you holding the fish. That’s absolutely fine. I believe it’s an important part of the equation, and holding our catch is a way of possessing it, sealing the triumph, even though we may ultimately release it.
All of the same rules mentioned above apply here. Get the shot set up before even taking the fish out of the net. Make sure your fly rod is out of the way or close at hand if you want to use it as a prop, your phone is steady on your pack, a log or rock, or on the bank somehow and frame the shot. Use your phone’s automatic timer and only press the button when you’re absolutely ready.
The common behavior among anglers is to hold the fish with stretched out arms to make it look as large as possible. Granted, these catches can look mighty big, but when it’s really obvious what you’re trying to do, nobody’s going to take it seriously even if it was a big fish. In my experience, truly big fish don’t need any help looking big, and if you really want people to notice, don’t outstretch your arms. Rather, get closer to the camera. Fill the frame with you and the fish.
Showing off a fish in a hero shot is also about how you hold it. Follow the suggestions above, such as getting low with the camera and minding your fingers and hand placement.
Editing Software on Your Phone
By all means, use the editing software on your phone to crop, sharpen, and overall improve your photos. Unfortunately, there’s not a lot you can do to make a bad photo good. However, you can make a good photo great with a few touchups.
Why it Matters
If all you’re looking for is documentation of a catch, then none of this is probably important to you. A simple picture of the trout in the net or a quick snap before release is good enough. But we’ve all seen those posts on social media with pictures of obviously mishandled fish, and we’ve all read the string of comments discouraging the angler for how they’ve damaged the fish, which takes away from the overall experience, in my opinion. Next thing you know, it’s a bickering match over how to hold a fish and one group fighting with another over whether a fish will survive or die after such handling.
It needs to stop. We all make mistakes when handling fish, but hopefully we all have the opportunity to improve.
I’ll never stop taking photos of fish I catch. I love looking back over the day’s catch and reliving the thrill. Ultimately, we probably need to ask ourselves why we’re taking photos anyway, for our own joy or just to show off on social media? How you answer that question will likely determine how much care you take when handling and photographing your catches.
With the handling and photographing suggestions mentioned above, you can have the best of all worlds. Fish that have been properly handled and released as well as awesome photos that do the fish justice and serve not only as memories of a great day on the water, but as inspiration for future fishing trips, too. And when you share those picture with others, they’ll congratulate you on a job well done, not preach about what you should have done differently.
P.S. A special thanks to William for submitting this topic for a blog post! As noted in the newsletter, anyone who submits a question that is later used in a blog post will receive a free box of flies. William received a dozen of our favorite nymphs. Claim your dozen today and drop us a line to let us know what content you’d like to see on Dark Skies Fly Fishing! If we use your idea as a prompt for a blog post, you’ll receive a dozen free flies.
Did You Find This Guide For Photographing Fish To Be Helpful?
Stay up to date with the Dark Skies Fly Fishing monthly newsletter for free and receive the latest posts in fly fishing news, tricks, tips, and techniques, stream reports, as well as updates on new flies added to the Online Store and exclusive discounts!
Sign Up Now
Great article Ralph! Thanks for sharing these tips!
Thank you for reading!
Great idea to cover this topic and solid recommendations. I’ve always struggled with doing anything beyond taking a picture in the net and your suggestions on better alternatives are great.
Thanks for reading!
Great advice on how to get a good shot of the fish. Now can you help me out with any tips on what to do about my own ugly mug?
Lol! I look at it this way: if I catch a beautiful fish, nobody’s looking at me anyway! Best of luck!